Here are some pictures of some Gripping Beast plastic Saxons I painted up and double-based to form shieldwalls for Piquet: Archon. The variety of poses you can get from the plastics almost makes the annoying assembly worth it. Flag and shield decals by LBMS :
Sunday, April 21, 2013
Battle of Jakob's Ribs
Jed and I fought a Hostile Realms "friendly" match yesterday between his Undead and my Middle Kingdoms knights. Jed wanted to try a new unit mix for his Undead army to see if they could cope better with the extra-heavy knights of the Middle Kingdoms. 1750 points each.
The Undead fielded 24 units and leaders. The Middle Kingdom fielded 19 units and leaders.
The Undead army consisted of an undead dragon, wraiths, wights, vampires, a bone giant, zombie units, ghoul units, skeleton archers, infantry and cavalry, a unit of ghosts, and human minion cavalry. They were led by the Necromancer, a lich, and 2 wights.
The Middle Kingdom army consisted of extra-heavy household and feudal knights, 2 pike blocks of mountaineers and civic militia, an organ gun, a red dragon, archers from the royal guard, crossbowmen, handgunners, and sergeant cavalry. They were led by the King of the Middle Kingdoms mounted on a pegasus, Jhone of Orc, and a priest.
The scenario was that the town of Jakob's Ribs was besieged by the undead army and the Middle Kingdoms army was marching to raise the seige. In the pictures, you can see the brave defenders of the town in the top corner, barricaded in their burning city.
I had 24 morale chips and I think Jed had 28 morale chips.We both rolled excellent generals, so each of us added the Brilliant Leader card to our decks. I added an extra Courage card to my deck because I was fighting the Undead and my final optional card was Look to the King.
The Undead added a brilliant Leader card, an Uncontrolled Charge card, and a Superstitions and Omens card to their deck.
So as the battle starts, each side rolls initiative dice. The difference between the initiative dice is the number of cards that each player can play from their decks. The types of cards pulled dictate what the army can do. Initially, the Undead had their typical trouble drawing Move cards, but then Jed drew his Uncontrolled Charge card. This sent the undead dragon and bone giant hurtling across the table and they crashed into the flower of Middle Kingdom chivalry before the poor knights could even get out of their deployment zone!
After the knights drove off the undead dragon, my own red dragon flew across the table and breathed fire on the unit of ghosts. The dragon then crushed the crispy ghosts and charged into a skeleton unit behind them. Behind the dragon, the cavalry and pike blocks of the main infantry command advanced.
While the pike blocks fought very well, they faced a real challenge against the skeletons. Even though the skeletons lost wounds to the pikes, they wouldn't rout, and the human infantry gradually tired as they fought them. This was the first battle we fought where it really felt like the skeletons were fighting the way we imagined they would.
By the time we had to pick up the table, the Undead had run out of morale chips. Middle Kingdom was leading 12 -0, but the Undead had rallied their undead dragon and their vampires had just landed and begun slaughtering the missile troops of the Middle Kingdom infantry command. A unit of wraiths fought a knight unit, and because the knights didn't have magical weapons, they couldn't do any damage to the ghostly warriors. Eventually, the human knights had enough and they fled in fear from these invincible wraiths.
The outcome was still in doubt, but most importantly, the undead showed they could hold their own against the knights of the Middle Kingdoms. The skeletons were great at slowing down the attack. The undead dragon and bone giant also used their "Might" special ability to great effect, smashing through the extra-heavy armor of the knights as if were tissue paper.
The Undead fielded 24 units and leaders. The Middle Kingdom fielded 19 units and leaders.
Left Middle Kingdon Right Undead |
The Middle Kingdom army consisted of extra-heavy household and feudal knights, 2 pike blocks of mountaineers and civic militia, an organ gun, a red dragon, archers from the royal guard, crossbowmen, handgunners, and sergeant cavalry. They were led by the King of the Middle Kingdoms mounted on a pegasus, Jhone of Orc, and a priest.
The scenario was that the town of Jakob's Ribs was besieged by the undead army and the Middle Kingdoms army was marching to raise the seige. In the pictures, you can see the brave defenders of the town in the top corner, barricaded in their burning city.
I had 24 morale chips and I think Jed had 28 morale chips.We both rolled excellent generals, so each of us added the Brilliant Leader card to our decks. I added an extra Courage card to my deck because I was fighting the Undead and my final optional card was Look to the King.
The Undead added a brilliant Leader card, an Uncontrolled Charge card, and a Superstitions and Omens card to their deck.
So as the battle starts, each side rolls initiative dice. The difference between the initiative dice is the number of cards that each player can play from their decks. The types of cards pulled dictate what the army can do. Initially, the Undead had their typical trouble drawing Move cards, but then Jed drew his Uncontrolled Charge card. This sent the undead dragon and bone giant hurtling across the table and they crashed into the flower of Middle Kingdom chivalry before the poor knights could even get out of their deployment zone!
Undead dragon |
Ghouls, zombies, and skeletons |
The Middle Kingdom army is deployed |
Defenders of Jakob's Ribs |
Before the battle, the garrison looks out from their fortifications. The lord looks out from the church steps while archers in the tower seek out new targets. |
Unit of ghosts. These were later breathed on by a red dragon and crushed. |
Jed drew the Uncontrolled Charge cards from his deck and his bone giant began a charge toward the waiting knights. |
The undead dragon joined the giant in the charge and killed two units of knights before he was driven off. |
After the knights drove off the undead dragon, my own red dragon flew across the table and breathed fire on the unit of ghosts. The dragon then crushed the crispy ghosts and charged into a skeleton unit behind them. Behind the dragon, the cavalry and pike blocks of the main infantry command advanced.
My red dragon flew across the table and launched itself at the undead. After initial success, he routed after being flanked while disordered. Too exposed. |
The knights led by their Rex grind down the bone giant. |
Cool shot from table level shows the chaotic fighting as the pike blocks and sergeants launch into the battle. In the background, the organ gun blasted a unit of wights, killing 3 of the 4 stands. |
Cavalry battle on the right flank swirls around the bone giant. He did a good job of blocking the knights and absorbing damage. |
The wraiths killed the organ gun, but the battle continues to be very confused. They are hesitant to attack the pikemen |
Long shot of the table. The undead lich has managed to rally the undead dragon while my dragon is fleeing off the table. Bad news for me. |
The outcome was still in doubt, but most importantly, the undead showed they could hold their own against the knights of the Middle Kingdoms. The skeletons were great at slowing down the attack. The undead dragon and bone giant also used their "Might" special ability to great effect, smashing through the extra-heavy armor of the knights as if were tissue paper.
Tuesday, March 5, 2013
Battle of Kasar River
This past Saturday, we fought another tabletop battle in our ongoing Hostile Realms campaign using Theater of War. Hostile Realms is a fantasy Piquet ruleset that uses custom-made card decks to determine what actions armies can attempt on the tabletop. Better armies have better decks.
The strategic situation is summarized here.
Undead Jed brought his undead army and he knew he was facing a tough battle against a much more numerous Middle Kingdoms (MK) army. His army was also unsupplied from the campaign actions, but we forgot to include that in the army preparation.
The mounted nobility of the MK knights were massed on the left flank under the command of their pegasus-mounted King. The center was held by 3 solid pike blocks of civic militia and mountaineers led by Jhone of Orc and her Blessed Banner. This infantry command was backed up by a unit of minotaurs and several longbow units led by a priest. The Middle Kingdom had 30 morale chips. The Undead had 20 morale chips.
As the battle began, the Rex landed between the armies and challenged the Necromancer to single combat. The Undead Necromancer wisely declined. Grinning, he pulled out a magic flute and raised a thick forest in front of the Middle Kingdom cavalry. The knights would have to fight their way around the tangled trees and through a unit of blocking wraiths of they wanted to flank the Undead. Luckily they had been given blessed weapons before the battle to help them fight the magical wraiths.
After a few card draws and Undead spell attempts, the Middle Kingdom drew their Uncontrolled Charge card. This card triggered impulsive charges by the heavily armored mounted knights on the left and the pikemen from the center command. The mounted knights crashed into a unit of Undead wraiths, destroyed it, and continued on to rout several units of minion cavalry.
The Middle Kingdom pikemen rammed their pikes into the defending skeleton infantry and began to slowly push them back. The Undead attempted to stop the momentum of the Middle Kingdom army with their own charge, but the solid pike blocks proved resolute. Meanwhile the bloodthirsty MK knights began to turn and roll up the flank of the Undead army. After several units had been destroyed, the morale chip advantage was Middle Kingdom 40 to Undead 0. The Undead drew their Army Morale card and were forced to make an Army Morale check because they had no morale chips left. They failed it by 1 and the Undead withdrew from the field.
The Theater of War campaign rules classified the battle as a Decisive Victory for the Middle Kingdom. Neither of us concentrated on capturing the various victory objectives on the table. The Middle Kingdom was determined to crush the Undead with its numerical superiority and the Undead were content to wait and attempt to gain advantage through their magic. The current National Will for the Undead was 21 (54-21). The Undead stood to lose a minimum of 22 National Will for the defeat so they lost the campaign. This last defeat weakened the power of the Undead Necromancer so his forces were no longer able to resist the might of the Middle Kingdom.
This concludes our test campaign! We will have to reset it for a new one.
The MK center commands. |
The battlefield seen from the end with the mounted knights. |
The Undead center. |
Close up the mounted nobles. |
The impetuous pursuers charge into melee after destroying the wraiths. |
Pikemen clash with the Undead center. |
The Rex skirmishes with some flying carrion. |
More impetuous knights pile into the minion cavalry. |
The Undead attempt to push back the pike blocks. |
The reserve command. The Priest was never able to get these guys moving. |
The pursuit continues. |
Skeletons crushed under thundering hooves. |
Long shot of the battlefield mid-action. |
Saturday, December 29, 2012
Finished 28mm dragons
I bought these two painted plastic dragons from the internet after checking them out at my local Toys R Us. I finally finished basing them. The basing gave me a chance to practice my winter basing techniques and use two mounted knight casualties from my Old Glory HYW Casualty pack. The mounted guys just wouldn't fit on my normal casualty markers.
To give you an idea of how big these dragons are, they are mounted on 100mm by 150mm bases.
I managed to get some snow on the horse too. |
This dragon looks like he wants to play with his food. |
The knight is about to be pancaked. |
I tried to scorch the bottom of the horse a bit with some smoke. |
Sunday, November 25, 2012
Winter Goblins WIP
Here are some pictures of the Winter Goblins I've been painting. The miniatures are from the plastic GW goblin spear regiment box set. I like how they've turned out. The box gives a lot of variety in posing and while removing the mold lines on the figures is annoying, for the most part, the sculpting is full of character.
The little guys are very animated which made it difficult to base them 4 figures per 40mm square base. I plan on using the units in attack column (2 bases by 2 bases), so these guys will be the front ranks of two units with their spears pointed forward. There is no way I could use the spear forward guys in a second rank of bases.
I'll paint and base two rear bases for each unit and use poses where they are holding their spears upright.
I guess I assumed since they were small goblins that basing them wouldn't be a problem, but I'm obviously going to have to plan the basing very carefully to fit the guys onto the bases. Otherwise, the bases won't be able to line up and touch each other. I could use slightly larger bases for them, but I'd rather keep the basing consistent through my armies.
Tuesday, November 13, 2012
Hostile Realms Campaign Playtest Turn Spring 2
![]() |
The complete campaign map. Middle Kingdom is tan. Undead are gray blocks. The Middle Kingdom is on the offensive. |
This is the second turn of our Hostile Realms Campaign we've played using Theater of War, Vassal, and Skype.
I've been playing the Middle Kingdom and Jed is playing the Undead.
The Undead were forced to retreat from the western city of Daniz after what we called a Marginal Defeat last turn. National Will measures your nation's desire to keep the war effort going. I believe the National Will starting amounts were Middle Kingdom 54, Undead 48. Jed lost 10+d8+d10 National Will for losing the battle and ended up losing around 27 points!!! So now MK leads around 54-21.
In Theater of War, each side builds a hand of cards by drawing from their own campaign deck. It costs impetus points to draw a card, discard, play a card, and act on a played card. This is the Spring 2 turn, so each player's hand can be up to 6 cards. Hand size changes each season. Impetus is determined by a d20 vs d20 roll with the winner getting the die roll difference in impetus points. The loser gets nothing.
As usual this game, my Middle Kingdoms armies did exceedingly well for impetus and I was able to initially cycle through the deck looking for the Officer Check card. Once I drew and played it, I built a supply depot in Daniz to provide a closer source of supply for my invading knights.
In the East, two of my Middle Kingdom feudal hosts (BG 2 each) held a war summit and agreed to put aside petty rivalries and join into a massive host under one leader (Officer Check). This new army became a Size 4 Battlegroup. This army then began marching north along the eastern coastal road. After they were shown some lightly defended fords by friendly farmers who had no desire to become zombies, the army crossed the Kasar River and entered the same road hex as 2 Undead Battle Groups who were guarding the eastern approaches to the Necromancer's kingdom.
I pulled the Supply card and Jed had some terrible luck rolling supply for his retreating army and one of the battle groups in the Kasar River hex. My army in the Kasar River hex was also blocking the easier road bound supply route for his retreating battle group. He had to trace across the desert, lengthening the path considerably.
I tried to pull cards from my deck to build a good battle hand to engage in battle near the Kasar River, but I had discarded quite a few useful battle cards while I was searching for that damn Officer Check card.
Jed started to win more impetus in the middle of the turn. He had trouble getting the right Move cards when he needed them. He played the Scout card and was able to spend impetus to discover that some of my armies threatening his lands from south of the Salty Bog were actually just cavalry screens (dummy Battle Groups). I then scouted his Kasar River armies and discovered my BG 4 was on top of a BG 2 and a BG 1. The dummy Battle Groups will reappear on the beginning of the Summer 1 turn in hexes containing actual Battle Groups.
With only a few cards left in my deck, I won approximately 12 impetus. I searched what remained of my deck and managed to pull an Attack card. My hand at the time consisted of Engage in Battle x3, Flank Attack, Strength, and Attack. Eager to take advantage of my numerical superiority, I played an Engage in Battle card to fight the BG2 at the Kasar River. I played my Flank Attack action card and Jed played a Retire card to avoid the battle.
Aaargh! Luckily, I had a few more impetus (and I had the 3 Engage in Battle cards in my hand almost the entire turn). I engaged the BG 2 again with my BG 4, played the Attack card this time and Jed opposed it with an Attack card. I think I had a Strength card and used the other Engage card as a Strength card to gain the battle advantage 3-2 (I believe Jed also had a Strength card).
I had wanted to try a Flank Attack scenario this game, but Jed wouldn't cooperate. :(
So with a BG size advantage of 2 and a battle hand advantage of 1, we drew our army strengths. I ended up with my entire campaign roster (25 slots) and Jed pulled 19 roster slots with 2 infantry choices and 2 cavalry/beast/large creature choices. It helped that I had a BG 4 because I was able to ignore a Numeric 3 card on my army pull and then drew an 8 instead.
Unfortunately for the Undead, Jed's battle group is also out of supply, so that will reduce the effectiveness of a few of his units. The battle will be a meeting engagement in light terrain. I expect Jed to choose a few more Level 3 and Level 4 spells this battle in an effort to overcome my advantage in numbers.
Below are some new additions to my armies. Both the Realm and the Middle Kingdoms can field a dragon in their campaign rosters. I bought both of these Safari dragons for under $20 each. They came painted and I think they look pretty great! I only need to base them!
The Rex tangling with a two-headed fire-breather! |
Sunday, November 4, 2012
Battle of Daniz
![]() |
Our Hero! |
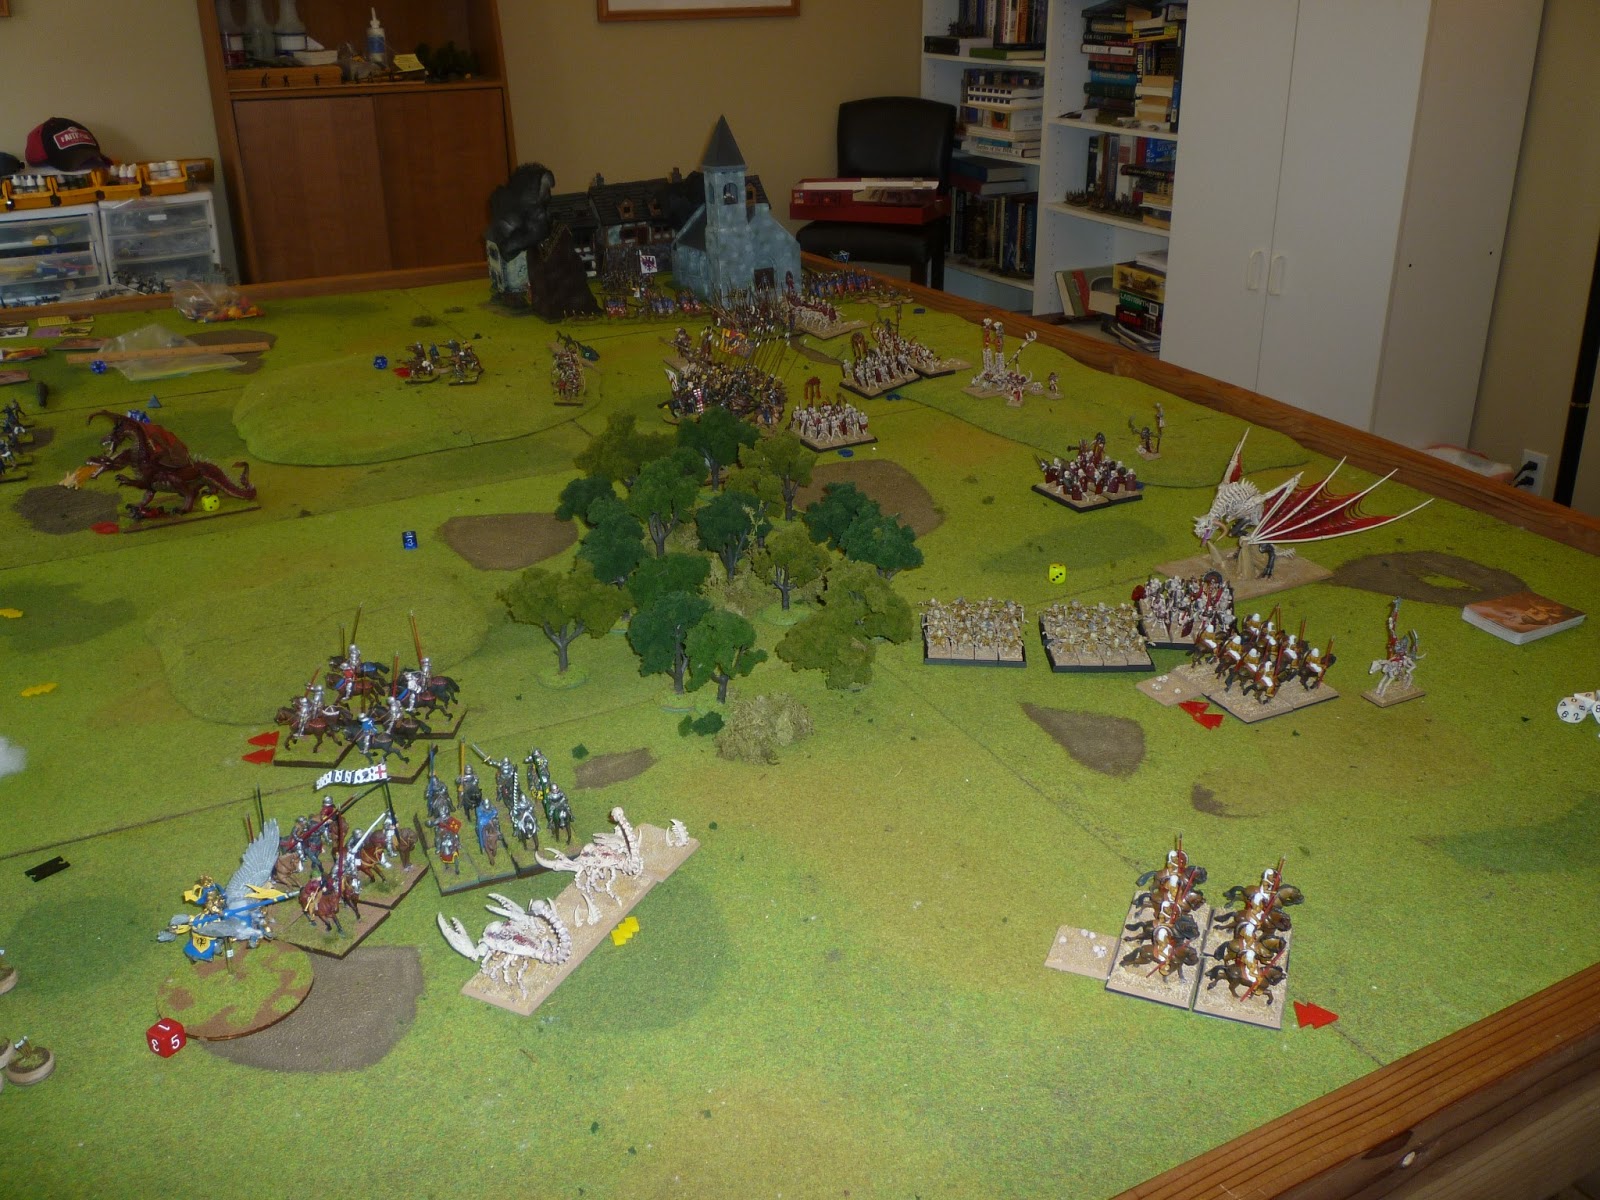
This is a battle report of the first battle we have generated with our test Hostile Realms campaign. The Middle Kingdom marched a Size 2 Battle Group into the lands of the Undead and engaged in battle with a Size 3 Battle Group belonging to the Necromancer's Empire. This battle took place near the undead city of Daniz, just west of the Salty Bog.
The city is located in a Light Terrain hex. We used my terrain generation card deck to generate the terrain for the table top, assign the battlefield objectives, and deploy the commands.
In the view below, the Undead are deployed on the right in 2 commands. The Middle Kingdom is deployed on the left in 3 commands. The battlefield had a Class II creek that ran the length of the table. Otherwise there were some roads, a few Class II hills, a Class III village, and a Class III town. The battlefield objectives from front to back in the photo below were:
- small hill in right foreground ( 2 VP)
- town in right center (13 morale chips)
- long hill behind the town (4 VP)
- village in left center at the end of the table (10 morale chips, 7 VP)
Below is a photo of the tabletop from the other end. The Middle Kingdom army was divided into 3 commands:
- Left Flank Command: 2 feudal knight units, 1 sergeant unit led by the Count of Bovis, a mounted hero. I rolled his quality and determined he was an Average (D10) leader with good combat skills.
- Center Command: Crossbowmen, hand-gunners, an organ gun, minotaurs, pike-armed civic militia, and a unit of household knights equipped with magic Horseshoes of Speed.. This command was led by Father Brutus. Father Brutus is an unusual-looking, short, grizzly priest whose family rushed him off to join the clergy early in his adult development. I rolled his quality and he was an Exceptional leader (D12+1), but a terrible spellcaster (D4 aptitude). Apparently, Father Brutus has alienated his deity.
- Paladins Under the Rex's Gaze: 1 unit of household knights equipped with magic Wings of the Pegasus. They are led by Jean the Good, the Rex mounted on a pegasus. I rolled Jean's quality and he was Abysmal (D6) as a leader, but phenomenal as a warrior. His poor leadership as CinC also added a Command Indecision card to the deck. Does this surprise anyone?
The council meeting in the Middle Kingdom's royal council tent was a scene to behold. The Count of Bovis, Father Brutus, and other leaders were standing around a map of Daniz when the Rex strode in and removed his helm. His hair was perfect and he flashed a winning smile to the nobles. He asked the assembled lords, "Are we ready to fight today?"
Brutus told the king, "Sire, the undead have skeletons and zombies, but our scouts report that they also have a bone giant, mummies, and a unit of magically protected wraiths. Perhaps we should discuss a plan to deal with these threats."
The Rex picked up his famed Mirror Shield and smirked at the priest. "You want a plan? Don't lose the battle until I win it." And he left.
Center command commanded by Father Brutus |
The Count of Bovis' mounted command advanced and captured the small village on the left flank. The infantry command advanced to threaten the the town in the center. An Uncontrolled Charge card sent the minotaurs charging impetuously toward the center of the Undead line.
The Undead were carefully using their magic to Bless their units and magically improve their capabilities.
Minotaurs charge the Undead |
The Middle Kingdom cavalry on the left flank moved to threaten the right flank of the Undead army. Meanwhile the Rex and his paladin bodyguard flew into the air and began to fly in a wide arc around the left flank of the Undead army.
The Undead moved 3 units of skeleton archers into the town in the center.
MK knights moving against the Undead right flank. |
After some lucky Move and Heroic Moment rolls, the Rex overcame his own poor leadership qualities and dive-bombed a unit of skeletons behind the Undead front lines.
Household knight equipped with Horseshoes of Speed gallop past the town to assist the Paladins Under the Rex's Gaze as they descend upon the undead in the background |
The minotaurs fled from melee after failing a morale check on a Courage card, but Father Brutus rallied them with some raw meat. They then promptly charged back into melee again.
And lost and routed away again. Sigh! At least they look tough.
You can see Father Brutus waving goodbye to his minotaurs. |
After another Courage card, the feudal knights in Bovis' command fled from a unit of wraiths. It's pretty understandable since they had no magic weapons and couldn't harm the wraiths.
Fleeing knights. |
Meanwhile the Rex and his paladins were starting to roll up the flank of the main Undead command.
The lich's attempt to cast a spell is defeated by the Rex's Mirror Shield. |
Victory for the Undead on this flank |
At this point, the Undead commander had to go home and acknowledged that his forces had at least suffered a Marginal Defeat. The morale chip count was 13-0. The undead wraiths could probably take back the small village on the flank which was worth 10 Morale/7 VP, but I don't know if they could reach it before the pegasus-mounted paladins caught them. The Rex clearly did win the battle with the help of his household knights. Most of the other Middle Kingdom units were routing, routed off the board, or disordered. Jean the Good is obviously a strategic genius.
Player's Notes:
Jed did a much better job with his magic in this battle. He used it to bolster his troops and with the poor magical abilities of my opposing priest, the Undead wizards were able to use magic very effectively on the battlefield.
Having 3 commands to Jed's 2 commands was a real advantage. The deployment draw also forced Jed to deploy his 2 commands first. I was then able to see his deployment and place my troops where they would be needed most. Having that 3rd command allowed me to give the Rex his own personal command with which he could deliver his flank attack. Drawing the Wings of the Pegasus magic item was also very lucky since the Rex was already mounted on a flying steed.
I (the Middle Kingdom player) kept my weaker infantry away from the Undead. Neither the mummies nor the bone giant were even able to get into melee. I also used my mobility to pick and choose where the fights would be. The 2 units of household knights were very fast because one was flying (Wings of the Pegasus) and the other had Boots of Speed. Between the two mounted units, they probably destroyed 5 units and cost the Undead around 20 morale chips.
Since most of the Undead units don't rout or retreat, they would just get pulverized by the knights for their full 4 wounds. The Pegasus Knights were Melee D12+3 to start and the attached Rex would raise them UP2. By himself, the Rex was something like Melee D12+5. The only other effective unit I had was the organ gun that managed to vaporize an advancing skeleton unit at point blank range with a single shot.
I was also pretty lucky because the Rex's low Command die initially worried me a bit. With only a D6 for Command, I needed to roll well to move them. Otherwise, I was concerned the Pegasus Knights would take too long to make their flank attack. Some good rolls and well-timed Heroic Moment cards allowed me to bring the finishing attack in the nick of time.
The Undead had trouble winning melees against the heavily armored knights. Sometimes this was because Jed rolled poorly, but I also avoided the mummies and the bone giant, 2 units I thought would be dangerous to my knights in melee. The giant is Mighty and ignores armor, so I knew I had to stay far away from him. Jed's other excellent unit, his wraiths, scared off my feudal knights with Courage checks, but never caused any wounds, ended up out of command on a flank and was isolated from the rest of the battle.
The Undead army has a lot of units with excellent special abilities, but it can be very difficult to manage. Jed has really been developing his techniques, but his most recent challenge has been which leaders to bring to the battle. Wizard commanders are ideal for the Undead, but they can't use their spells when they're attached to units. If the Undead doesn't bring a warrior-type leader that can attach to units, the army misses out on the Heroic Moment card which allows a unit with an attached character to treat the card as a wild card.
I screwed up with my magical item assignment. I should have assigned the Magic Shield to the Count of Bovis so he could use its magical capabilities to make effective attacks against the wraiths who are immune to non-magical attacks. Oh well, in the end, the Rex bailed me out with his powerful ego.
Subscribe to:
Posts (Atom)