Friday, October 14, 2011

Drive to Prokhorovka : Kursk Project Part 2

(ABOVE) Guards Airborne Division positions around Prokhorovka.
This post will provide some progress pictures of the painting I've been doing to fill out the 1st SS LAH Panzergrenadier Division's OOB for our Kursk project.

We ordered 10mm tanks and infantry from Pithead Miniatures.  I drilled out holes with a hand drill and glued plastic broom strands into the tops of the hulls for radio antennas.  Below are pictures of the German infantry and Panzer IV's in progress.  I primed them black and then glued the dirt ballast onto the bases.  I've learned through hard experience to glue the dirt on before I paint any of the details onto the miniatures. 

 (BELOW) 15 poses of infantry in the German infantry pack!  Pretty impressive.
I then did a heavy drybrush on the tanks with Vallejo  German Cam Orange and on the infantry with Vallejo German WW2 Green.  It's always best to test these colors ahead of time, because colors that work well for 28mm might not look as good for 10mm figures.

 I then washed the figures with my standard ink wash, dark brown Wonder Wash, that I get from the Warstore.
 (BELOW) After the ink wash, another dry brush with the base color on the tanks.


 (BELOW) Here are the German infantry with some of the details painted.

 My next step after painting the faces and equipment was giving the infantry a good wash with my Wonder Wash.  This gives the infantry a bit of depth, but it does darken the first dry brush.  The wash also covered any areas that might have been missed by the primer.

I then went back and highlighted the uniforms with the Vallejo German WW2 Green again.  This draws out the sharp colors of the base paint that were dulled by the wash.  If it doesn't highlight the details enough, mix it with a little white to lighten the highlight color.  Once the painting is done, I brush watered -down white glue on all the base areas where the dirt ballast didn't stick perfectly and where the figures don't match smoothly with the bases.  Dip in static grass and basing is done.  Nice and easy.


(BELOW) Here are the Panzer IV's after their final basing. and a dull cote varnish.


(BELOW)  I gave them a bit of dusting with some dirt and smoke pigments on their engines and the lower part of the side-skirts.I thought it might give the side-skirts a muddy look.  Do you think it looks good?  I might have gone a little overboard with it.  The final stage will be when I place decals on the tanks.


(BELOW) 2nd SS Panzer Grenadier Regiment and the infantry from the division's recon battalion.  I'll give them one more spray of Testors' dull cote to take the gloss from the ink wash off before they're done.  I think the infantry really came out great!  Excellent miniatures.  I finished them up in about 4 hours of painting:

Vallejo German Camo Orange: German tank base color
Vallejo German WW2 Green:  German uniforms and tank camo stripes
Vallejo Saddle Brown: Alternate tank camo stripe
Ceramcoat Charcoal: German helmets
P3 Paints Khardic Flesh: skin
Equipment: Vallejo Russian Uniform (gas cannisters, ammo cans), P3 Gun Corps Brown (rifle butts), P3 Bootstrap Leather (canteens, ammo pouches)


Sunday, October 9, 2011

Drive to Prokhorovka : Kursk Project Part 1

 Well, we've embarked on a project to recreate the 1st SS Panzer Grenadier Division Liebstandarte's(LAH) drive on Prokhorovka during the Kursk operation.  The scenario starts on the afternoon of 10 July 1943 and ends on the afternoon of 15 July 1943.  I'm going to document our progress through this project to give gamers an idea of how you can make a game from a idea or concept you get from that latest book you read.  Most of the operational details for this scenario come from the excellent Kursk book by David Glantz:

We're using the Field of Battle: WW2 rules to play out this large operational battle. The units in this scenario are 2 stand companies.  Companies are eliminated once they suffer 3 hits(stands).  Each day has 3 turns: AM, PM, and Night.  The map is shown below.

We're using 10mm miniatures.  The German infantry are Pendraken.  The Soviets will be Pithead Miniatures because they mix very well with the Can-Do pre-painted 1/144 plastic armor.  I purchased 48 Can-Do T-34's at Historicon so that did a lot to get this project going.  No one was looking forward to painting 48 T-34's.

This end of the table is the deployment zone for the Germans.  At the far end of the table is the city of Prokhorovka, 4 town sections.  If the German players have not captured all 4 town sections by the end of the game, they lose.  The starting German troops deployed on the table are the 1st SS PzGr Regiment, Recon Bn (not deployed) and the 1st SS Panzer Regiment.  On the morning turn of 11 July 1943 (Turn 3), the remaining troops of the 1st SS PzGR Division deploy:  2nd SS PzGr Regiment and the 1st SS Assault Gun Battalion.

 It might look hopeless for the Soviets, but the Soviets have more forces deployed across the middle of the board that are aren't placed on the table.  The 9th Guard Airborne Division is positioned in defensive belts in the middle of the table:  27 infantry companies, a tank brigade, another AT artillery regiment, and a KV-1 tank regiment.

On the Night turn of July 11 (Turn 5), the Soviets also bring on the 29th Tank Corps to counter-attack the Germans:  18 T-34 companies, 9 infantry companies, 4 assault gun companies, and a Guards Tank regiment.  Those reinforcements are sure to make the 12 July Day turns a lot of fun for the 1st SS PzGR commanders!

Basically, the Germans have to grind their way to Prokhorovka and attempt to get there without suffering devastating losses.  The LAH Division has a finite number of morale points and every time it loses a stand, it loses a morale point.  While stands can be rallied and tanks can be repaired, the effect of those losses on the Germans is permanent.  Once the Germans reach zero morale points, the division begins to check morale and once it fails, the operation is called off.

The Soviets, on the other hand, calculate morale points and check morale by brigade.  Once a brigade fails a morale check, it is removed from the table, but reinforcements enter the game fresh and eager for their chance to drive back the Germans.

Another rule we plan on using for the scenario reflects the fact that SS Totenkopf and Das Reich fought on either side of the LAH, but they had a terrible time making headway and the LAH Division was constantly worrying about its flanks.  We plan to use markers on each long board edge, Totenkopf for the north side and DR for the south side.  We'll roll a D6 at the end of each turn and if they roll a "6", the marker advances 1 foot reflecting the advance of the flanking forces (+1 next time if you fail, cumulative).  The Soviets can always spend 2 asset points on a Move card to bring on 1 reinforcing brigade on a flank on the next Move card, but it can never be behind the flanking markers.  The Soviet player has to announce he is doing this since the Germans usually saw the Soviets coming and get some advance warning.

This forces the Germans to keep some of their forces behind the main lines to foil these flanking attacks and the German player will curse the other divisions for not keeping up.  Historically the recon battalion and even the artillery park were diverted to drive off these flanking attacks.

 Below is a photograph of Hill 241.6 This is the first objective for the Germans.  It is defended by 2 Soviet AT artillery regiments (2 AT bunker companies each) and a Soviet Motorized Rifle Brigade (MRB) waiting patiently behind the hill.  The German armored companies start the game having suffered heavy casualties fighting though the Soviet defensive belts.  All 8 Pz IV companies have a 1 stand loss and the Tiger company has suffered 2 stands lost.  The Germans need to seize this high ground early to give them a sheltered area behind it where they can refit and repair their battered armor units.  The hill is a Turn 1 objective.  Take it before nightfall.  I scratch-built the bunkers out of Sculpey, wire, and toothpicks.

 Below are the starting German forces.  The tanks are a hodge-podge of armor only because I haven't finished painting the Pithead Panzer IV's that were delivered.  During the play-testing, I'll slowly replace them with the finished miniatures.
Below is  Prokhorovka, the ultimate objective.  As the project progresses, I'm going to paint and add more Russian buildings to fill out the town areas.  I use 6mm buildings for the terrain.  I think the 6mm terrain scales better than if we used larger 10mm terrain that matched the miniatures.
 Below is a close-up of some of the Germans.  Pendraken infantry with plastic Can-Do tanks.

Below is the Pithead infantry and Panzer IV's.  The tanks are equipped with antennas (plastic broom stands) and sideskirts.
 Below is a Panzer IV in progress.  Just testing out the paint scheme.  You know, it's always funny how the digital camera shots with flash bring out the flaws in my painting.  Looking at the pics, I notice small areas that need paint, but none of them are visible to the naked eye.  Interesting.  And annoying.  More to come!

Monday, September 19, 2011

Front Rank SYW Prussian Hussars


 I recently painted a unit of Front Rank 28mm Prussian SYW hussars for a friend.  I thought I'd share the results.  The figures are well-sculpted and they were fun to paint.  The request was that I would paint them as the famous "Death's Head" hussars.  Since the skulls aren't sculpted on, I had to paint those little suckers free-hand!

 (ABOVE) Two troopers


Battle of the Somme 1411

Here are some photos from our most recent fight between the Constable of France and our favorite Burgundian, John the Fearless. Burgundy has formed a secret alliance with England and has marched into the Somme river area to claim some of the towns located there. The Armangac Constable of France has been ordered to drive Burgundy back before English invaders land on the mainland. The Duke of Burgundy is a vassal and blood relative of the French king, right? Well, things in France are a bit complicated.

In Piquet, you draw cards from the Army Characterization Deck prior to the battle. These cards might give you morale bonuses, extra cards, special stratagems, and most importantly, morale chips which measure the capacity of your army to take losses and setbacks throughout the battle.

The Burgundians drew 22 morale chips.

The French drew 9 morale chips, an extra Cavalry Move in Open card, an UP1 Morale Die for Infantry card and a Reinforcements Stratagem. The French traded in the UP1 Morale card for another draw which gave them a 6 morale chip card for a total of 15 morale chips. They kept the extra cavalry move card and the Reinforcements Stratagem.

Unfortunately, the reinforcements (6 more units) would not arrive until Turn 6!! It was a d6 for units and a d6 for turns. We normally allow players to trade in special ACD cards to draw more morale chip cards from the deck, but we do not allow the players to trade them in after they decide to roll for the particular stratagem card to see how good it is. Once the player decides to keep the Stratagem card, he can't trade it back in because he tanked on the result. Tough luck.

So, the French are more brittle when it comes to morale, but their deck is souped up with an extra card. Let's do this!

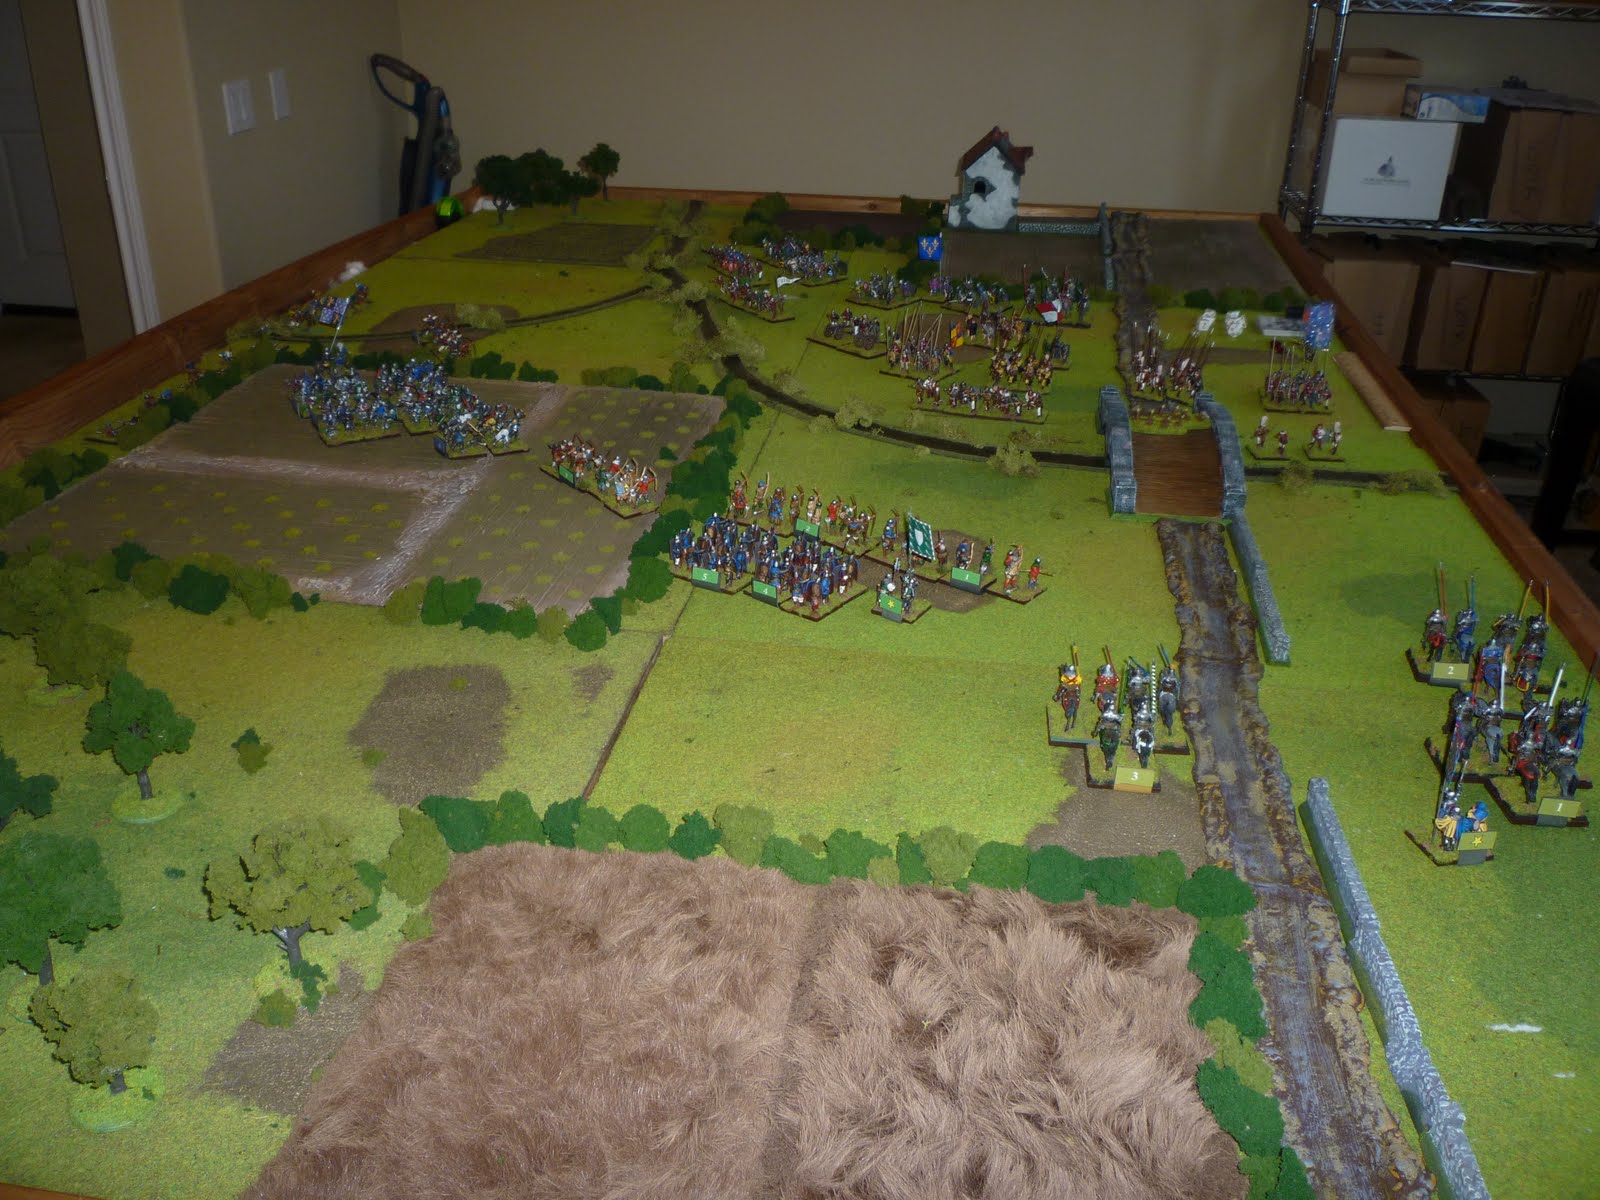
(ABOVE) The battlefield. The Burgundians are on the left. The French are on the right. That's a road running down the middle of the table. The table is actually for my Kursk scenario I'll be testing over the next few months. Works just as well for the Hundred Years War.

(ABOVE) Hundred Years War Burgundians. French dismounted Men At Arms (MAA), Picardy longbowmen, and low country pikemen on the right flank. Mounted retinue knights, low country crossbowmen, and Burgundian dismounted MAA in the center. Burgundian dismounted MAA on the left flank near the woods (they are rated as Militia. Not good).

Militia troops are vulnerable to the Levy Apprehensive card. When this card appears, all levy troops rated as Militia or worse have to check morale. If the majority of the levy troops fail the check, all of the levy troops flee the table unrallyable. All Hundred Years War armies have this card in their decks, but only the Burgundians have militia men at arms so the Burgundian commander's heart always skips a beat when this card flips over.

(ABOVE) Late Hundred Years War French. Mounted men at arms (MAA) on the left flank. Dismounted MAA, brigans (common pikemen), and Voulgiers (common Halberdiers) in the center. Peasants, skirmishers, bowmen, and crossbowmen on the right flank. Somebody plans on using that extra Cavalry Move in Open card! Cavalry can only move on that card. The 28 card French deck normally has only 3 of them.

(ABOVE) The French mounted left wing charges over the hill into the Burgundians. We actually used a cavalry morale challenge and an opportunity charge against the archers at the top of the screen. And we did it properly! Hooray for us! Then I pulled the Courage! card. Aaargh. All units in contact check morale. Luckily, only one unit failed and went disordered.

In Piquet: Band of Brothers, cavalry can attempt to intimidate and disorder other units by issuing a cavalry morale challenge and literally challenging the morale of the target unit. If the target fails, it becomes disordered. Disordered units (and flanked units, for that matter) then become possible targets for Opportunity Cavalry Charges. So, a unit of knights can challenge an enemy unit, disorder it, and then charge into melee with it.

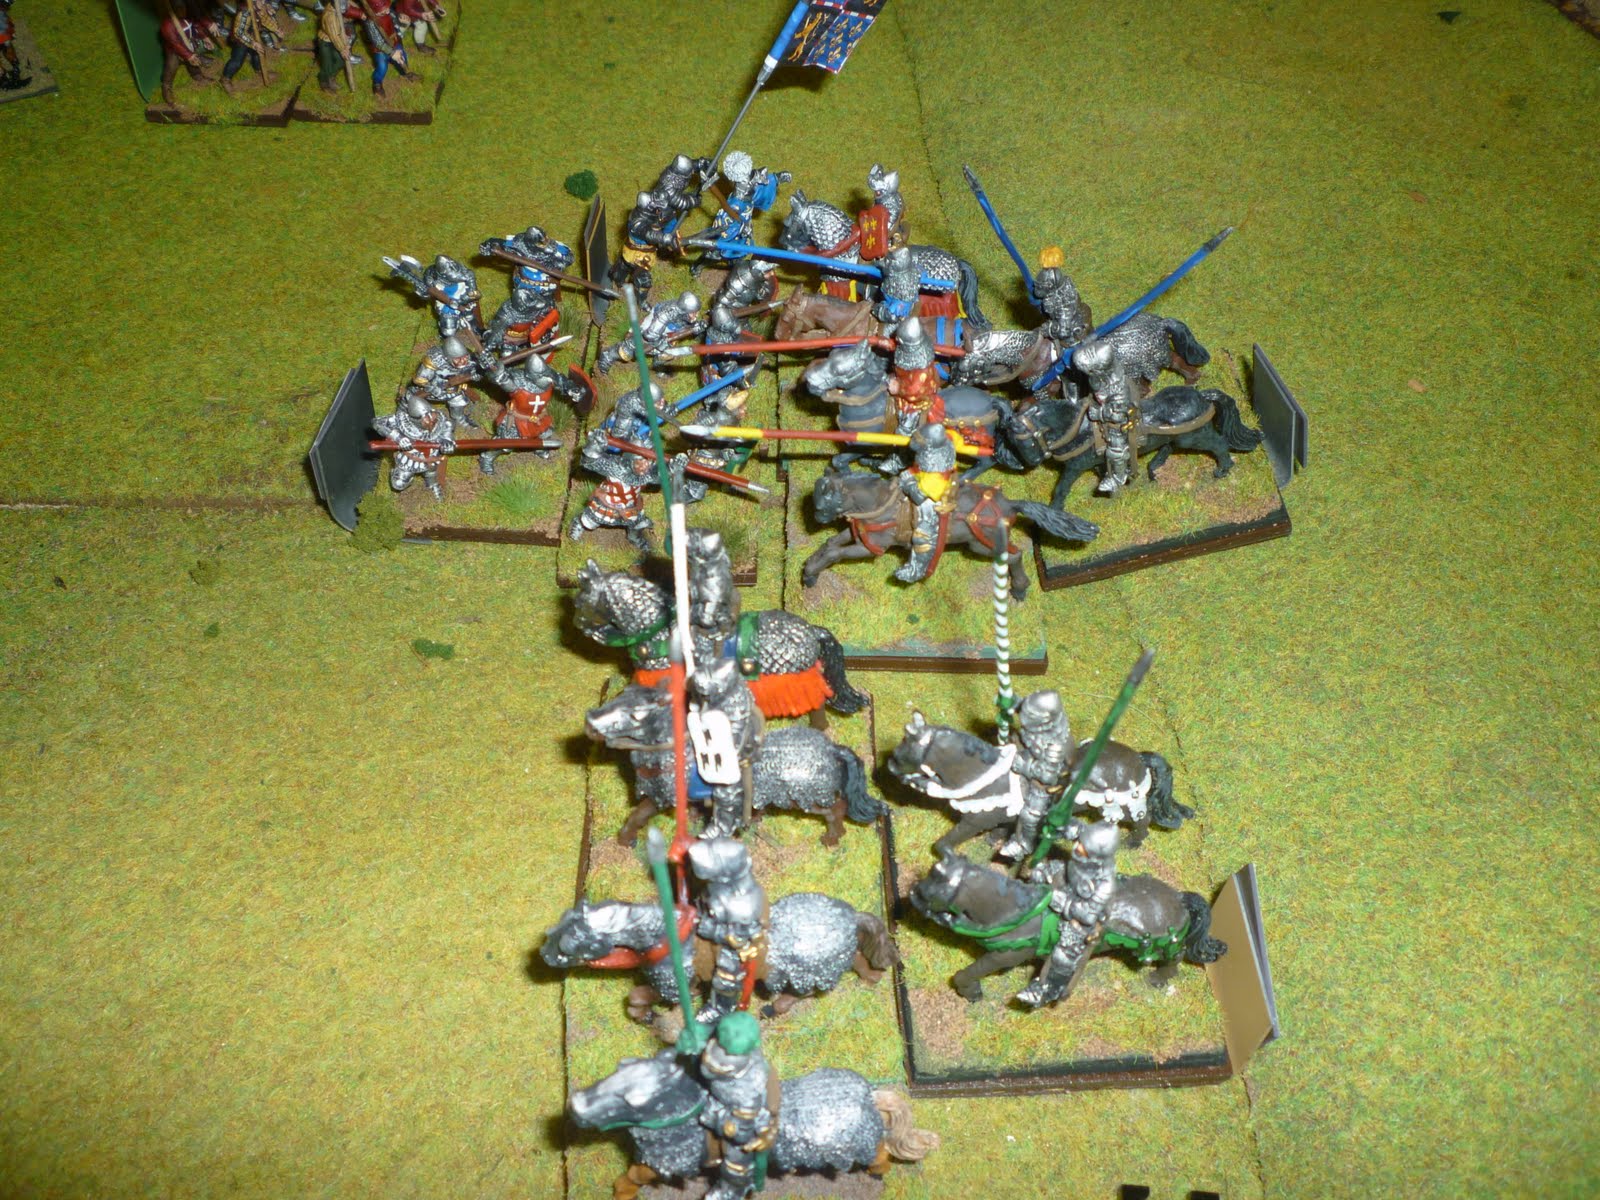
(ABOVE) Another cavalry morale challenge followed by an opportunity charge against dismounted French men at arms. Burgundy (Jason) started grumbling a bit about the overwhelming cavalry advantage enjoyed by the French.

(ABOVE) Mounted knights doing their thing!

(ABOVE) These Low Country pikemen took advantage of some great impetus to engage this French MAA unit in the flank, automatically disordering it. Looks bad for the French.

(ABOVE) D6 versus D12 results in a 2 to 1 win for the knights! Jason must have rolled a "1" five separate times in melees during the game. Followed by a morale challenge, the pikemen routed.

(ABOVE) In the foreground, the French mounted knights have crushed the Burgundian right flank. A few impetuous nobles rode off the table in pursuit, but the French horse just need to reorganize from disorder and things should be just peachy. In the top right corner, you can see the Burgundian mounted retinue knights going after the French commoner infantry. The battle lines have become a bit confused. The French have no morale chips left at this point!

(ABOVE) A few moves later. Both sides have taken Major Morale checks. Morale chip count is 4-0 Burgundians.

(ABOVE) The Burgundian retinue knights, eager to get out of armor and into their nice, silky court clothes, attack and crush a unit of French brigan pikemen. Yes, they are led by an English duke. The Burgundian army is an international force!

(ABOVE) The last unit of mounted French knights with leader attached fights off another unit of Low Country pikemen D6 vs. d12 = 3 to 1!

(ABOVE) On the next turn, the pikemen advanced again, despite their disorder and drove off the French knights. The French pulled a Major Morale Check card, down 12-0 in morale chips. The French withdrew from the field.

The Burgundian commander has since reassessed the battle and decided his army needs one major upgrade: MORE LOW COUNTRY PIKES!! And better dice.


Sunday, August 28, 2011

Piquet games at Socal Smackdown

We'll be running Piquet games on the 3rd and 4th of September at the Socal Smackdown convention near Disneyland in Anaheim, CA. The games will be Band of Brothers on Saturday and an Archon: Punic Wars battle on Sunday. It's a great opportunity to try out the Piquet rules. Feel free to sign up and come by to play!

http://socalsmackdown.com/

Monday, August 15, 2011

Burgundy Forever!

This battle was a hypothetical Hundred Years War battle roughly based on the Battle of the Golden Spurs. A Flemish city has revolted against the authority of John the Fearless, Duke of Burgundy. Their revolt has been sponsored and supported by the Armagnac followers of the King of France. The Duke has raised an army of his vassals to enter the city and crush the revolt. The rebellious guildsmen are attempting to block the passage of the Duke's army at a river. If the rebels can hold off the Burgundians for six turns, it will encourage other Low Country towns to rise up against the Duke's authority.

(ABOVE) View from the Burgundian side.

(ABOVE) View from the Low Country side of the battlefield. The Low Country troops are defending from behind the river. The main river is a Class III obstacle. The side branch is a Class II stream.

(ABOVE) This bridge is on the left flank of the Low Country defenses. It is barricaded.

(ABOVE) The Low Country army consists of 4 units of militia pikemen, 3 units of mercenary crossbowmen, 4 units of burgher knights, a unit of mounted French knights, and an organ gun battery. Their general is Average.


(ABOVE) The Burgundians have 3 units of mounted knights, 5 units of dismounted Burgundian knights, 2 units of mercenary spearmen, 3 units of Picardy longbowmen, and one unit of English longbowmen. Greg rolled up an Abysmal general. Poor Greg!

(ABOVE) The French archers approach the river bank and fire against the crossbowmen with little effect.


(ABOVE) The river has been crossed.

(ABOVE) The Burgundian knights crossed the river and were blasted by the organ gun. The organ gun fired with great effect during the early part of the game. Meanwhile the Burgundians successfully forced the bridge and Low Country pike units have started forming into Hedgehog.

(ABOVE) Burgundian cavalry attempts to force the river and bridge.

(ABOVE) Reinforcing burgher knights drive off the Burgundian dismounted knights' assault

(ABOVE) The cavalry unit assaulting the bridge was driven off, but another unit of mounted knights managed to ford the river. (BELOW)


The knights crushed the disorganized militia pikemen, but were then caught while pursuing and defeated by the French knights who waited in reserve. (BELOW)


The end result was a resounding win for the rebellious burghers. It was a good playtest of the scenario that was made much more difficult because Greg's Burgundian general ended up as an Abysmal commander. The Burgundian knights are terrible and about the same quality as their rich city counterparts. Known more their courtly manner and fine clothing, the militia-rated Burgundian men-at-arms underperformed once they realized the common townsmen actually planned on putting up a fight. Greg probably rolled up at least half of his units as poor, battle weary quality.

The militia pikemen were average (good against cavalry), but the Low Country mercenary crossbowmen were very strong and I might reduce them to two units the next time we play. The heavy armor of the crossbowmen was a big advantage against the Picardy longbowmen. The organ gun battery was fun and did pretty well.

Greg felt the river was too difficult an obstacle, so I plan on reducing it to a Class II obstacle. That will still make the river a Class III obstacle for the Burgundian mounted extra-heavy knights.