Tuesday, April 23, 2013

Solo Piquet Tutorial Part 3: The Battle of Cross Keys

This is obviously Part 3 of my Solo Piquet Tutorial.

SKIRMISH STANDS

In Hallowed Ground, we also have to roll to determine how many skirmish stands will be present on the battlefield.  I rolled high for both sides, so the Union will get 3 skirmish stands and the Confederates will get 2 skirmish stands.  At this game scale, skirmish stands are assigned to particular regiments and they give Skirmish Superiority (a bonus to shooting) if your opponent doesn't have a skirmish stand.

OPTIONAL RULES

Part of the fun in Piquet is all of the options that are available for your games.  I will be playing with the following rules that are optional for Hallowed Ground:


  • Unformed - Units can become unformed due to general confusion or combat.  This can be fixed with an Officer Check card or during a Move card used to reorder the ranks.
  • Reserve Move - The Difficult Terrain Move card can also be used as a Move card as long as the moving unit is never moves closer than 12" away from the enemy.
  • Morale Challenge - Only the side that loses a Morale Challenge pays the morale chip.
  • Risk to Officers - Based on the combat action of the subordinate units.  Checked on Officer Check card.
  • Counterbattery fire - Makes it more difficult for artillery to fire on other artillery.
  • New Out of Command rules - The most current rules for Out of Command.
THE BATTLE

The battle represents Fremont's half of a two-pronged attack on Jackson's army.  Poor Fremont ran into Trimble, an irascible, grizzled warrior who handed him his lunch.  Ewell's Division is assigned to hold off Fremont while Jackson destroys Shield's Union force.  The Union gets 5 VP for controlling each 1 foot wide length in the center of the south table edge.  Basically the road exit and the area around the creek.

The Confederates have to keep the Union from winning.  They also get 5 VP's for each section of the east side of the central hill they control.  This would mean they have to cross the eastern branch of the creek and climb the hill.

Stahel's Union brigade is leading the attack.  It has 4 Regular regiments and an Elite regiment.  It is supported by an artillery battery.  The front 2 regiments are in extended line and the skirmish stands are deployed.  The 2nd line consists of 3 regiments in attack column formation.   Its mission is to secure a bridgehead across the creek.

Trimble's brigade is defending.  It has 1 elite regiment (15AL) and 3 regular regiments.  The 15th Alabama is defending the creek in extended line with skirmishers attached.  The other 3 regiments are in skirmish formation defending the wood line.

15th Alabama grimly stares across the creek.


The woods are all Class III woods.  Units must stop when they contact woods and they become out of command.  They can only enter and move through woods on a Difficult Terrain Move card.  They move half speed.

The creek is Class II.  Units stop when they contact it.  Half move to cross it.

Hills are Class II.  Units stop when they contact the hill.  Normal movement thereafter.

NEXT, Part 4.  Let's start fighting!

Monday, April 22, 2013

Solo Piquet Tutorial Part 2: The Battle of Cross Keys

This is Part 2 of my Piquet Tutorial ACW Battle.

COMMANDER QUALITY

The next step in preparing for the battle is rolling for the quality of the commanders.  At Cross Keys, the Army Commanders were Ewell for the Confederates and Fremont for the Union.  The Hallowed Ground supplement has modifiers for this d20 roll: -2 for the Union and +2 for the Confederates.

I rolled a "4" for Fremont, modified to a "2".  This makes Fremont an Abysmal Army Commander.  He adds 2 Command Indecision cards to the Union Sequence Deck.  These cards will wipe out the Union's current impetus when they are flipped.  His command radius is only 8".  This seems pretty historical.

I rolled a "5" for Ewell, modified to a "7".  This makes Ewell an Average Army Commander.  He has no effect on the Sequence Deck and a 12" command radius.

If I had rolled a modified "19" or "20" for him, Ewell would have been Superior and he would have added two Brilliant Leader cards and had an 18" command radius.  Brilliant Leader cards are wild cards that can represent any card in the deck.  Awesome, but sadly not for this game.

There are 4 brigade commanders in the battle.  Their quality ratings establish their command range and how well they can rally units under their command.  The Union has 2 brigade commanders: Julius Stahel and Henry Bohlen.  There are no modifiers for Union command group commanders for this period in Hallowed Ground.  I rolled an "18" for each!  They are each Skilled with a 12" command radius!  Too bad they have to work for Fremont.

The Confederates have 2 brigade commanders: Isaac Trimble and Arnold Elzey.  Hallowed Ground modifies Confederate command group officers by +1 for this period.  Trimble is rated by the scenario as Superior, so he has a command radius of 18".  I rolled a "3" modified to a "4" for Elzey.  This makes Elzey a Poor brigade commander with a command radius of 12".

So that's it for the commanders.  I would normally go through the same process to roll up the quality of the units in the battle.  They are also modified by Hallowed Ground.  For example in this period, Union artillery are +1, cavalry are -2, and infantry are +0.

However, I like to wait until the unit actually does something in the game before I roll for its quality.  Using my method, you never know whether that unit of elite Texans is Tired or Determined until they actually get into the action.  So, we'll go over this when it occurs during gameplay.

ARMY CHARACTERIZATION

Now we determine the Army Character using the Army Characterization Deck.  This will establish whether the armies get any special cards, stratagems, additional sequence cards, combat bonuses, and how many morale chips they will have.  Morale chips allow you to rally units, pass army Major Morale checks, and challenge the enemy's morale.  You lose morale chips when you lose melees, your units rout or become disordered, or they suffer casualties, Once you run out them, you are in deep trouble.

I added up the number of units in each army.  Guard and Elite units count double.  The Confederates have 9 units and 1 of them is elite for a total of 10.  The Union has 11 units and 2 of them are elite for a total of 13.  You then divide this total number by the card divisor number in the Hallowed Ground army list for this period (3 for Confederates, 4 for Union).  Remainders are lost.  So both armies will flip 3 Army Characterization Deck cards.

The Confederates flipped a 9, a 4, and 10 for a total of 23 morale chips.  That's a lot!  They should defend the battlefield with grim resolve.

The Union flipped an Extra Infantry Move card, a Cavalry UP 1 Die in Melee card, and a 5 card.  You have to have at least as many morale chips as you have units if you want to keep the special effect cards.  Since the Union have no cavalry, I gladly discarded the Cavalry Melee card and drew a new ACD card: a "3" card.  Still not good enough, so I had to also discard my Extra Infantry Move card.  The replacement card was a "4" card.  Not great considering these cards range from 2-10 in my ACD deck.  So the Union has 12 morale chips.  More than the number of units in the Union army, but not good.

Army Characterization Deck cards from the deck I designed.
ACD cards come with the Piquet rules, but they don't look like these.
However since the basic Piquet rules are like $5, that's pretty good.

So to sum up so far, Fremont is terrible (literally "Abysmal"), but his brigade commanders are really good.  Ewell is average, Trimble is Superior and his partner brigade commander is Poor.  The Confederates are well-fed, rested, and motivated by lots of morale chips.  The Union army is high quality, but tired and brittle with low morale chips.  We can probably blame Fremont for that also.

Next, Part 3, a discussion of optional rules I'll be using and then we'll start fighting the battle!

Solo Piquet Tutorial Part 1 : The Battle of Cross Keys

While I've always felt that Piquet was a fun ruleset for wargaming, I think one of the best products of its card-driven action and unpredictable impetus is its usefulness as a solo wargame system.

I'm going to be posting the step-by-step progress of an example solo Piquet game.  I'm using the Battle of Cross Keys scenario from the Hallowed Grounds Scenario Book 1.  The Piquet rules supplement will be Hallowed Ground.  Cross Keys was fought on June 8, 1862 as part of Jackson's campaign around Port Republic.  It is limited to around 8-9 units per side and the size should be ideal for this tutorial.  I'm less concerned with the historical accuracy of this particular scenario than I am about showcasing the Piquet system.

Cross Keys battlefield.  The play area ends where the creek at the bottom cuts off.
The Union is attacking towards the camera and down the hill.
They must cross a creek to get to the Confederates.  Wooded hills
are on either side.  A road runs up the eastern (right) side of the table.


The first step in Piquet is to establish the sequence card decks for each side.  I opened up the Hallowed Ground rule supplement and I went to the section on ACW-Eastern Theater 1861-1862.  This gave me a breakdown on the cards that each side should have in their decks.  I have no cavalry in this battle, so the deck will have no Cavalry Move In Open cards.  Per the scenario, the Confederates get an extra Move in Difficult Terrain card in their deck.  In the end, I determined that each side will have 28 sequence cards in its deck.

The decks break down as follows (Union/Confederate):
Artillery Move   3/2 ; Moves and limbers/unlimbers artillery.
Artillery Reload 3/2 ; Reloads artillery so it can fire again.
Deployment 1/2 ; Allows units to change formations.
Dress Lines 6/3 ; Wasted card.  Produces command delay.
Elites Reload 1/1 ; Elite units can reload on this card.
Heroic Moment 1/2 ; Increases the effect of the next card or can be used for a shooting bonus.
Move in Difficult Terrain 2/3 ; Allows movement through difficult terrain (woods in this scenario).
Infantry Move in Open 3/3 ; Allows infantry to move and maneuver at a higher cost.
Maneuver 2/2 ; Units can change facing.
Melee 2/3 ; Units can initiate melee against a unit they are in contact with.
Musket Reload 2/2 ; Unloaded infantry can reload.
Officer Check 2/3 ; Commanders can move, rally, and re-establish command over their units.

Examples of my cards.  I designed these cards using a POD service, but basic cards do come with the Piquet standard rules.


So, looking at the cards in the two decks. the differences between them are pretty obvious.  The Union has an advantage in artillery cards, so the Union artillery will most likely move, deploy, and fire more often than the Confederate artillery.   The Confederates have an advantage in Deployment, Difficult Terrain, Heroic Moment, Melee, and Officer Check cards.  The Confederates will most likely have more opportunities to change formations, move through tough terrain, fight in melee, and their leaders will be more active in keeping the troops rallied.

In my next post, I'll discuss how these sequence cards work in the game, how you determine unit quality, and how you use the Army Characterization deck to figure out how strong your army's morale is.

And now here are some general fluff pictures.

Confederate reinforcements for the 2nd turn.
Elzey's Brigade and a smoothbore battery.

Union reinforcements for Turn 2
Bohlen's Brigade.

The starting forces face each other.
  These are their general locations.  I might adjust positions
and formations before the game start.

Starting Confederates.
Trimble's Brigade.

Stahel's brigade.

A few extra cards that might show up in this particular
game.  There are quite a few other optional cards that can
add flavor to different scenarios.


Sunday, April 21, 2013

Gripping Beast plastic Saxons

Here are some pictures of some Gripping Beast plastic Saxons I painted up and double-based to form shieldwalls for Piquet: Archon.  The variety of poses you can get from the plastics almost makes the annoying assembly worth it.  Flag and shield decals by LBMS  :


Battle of Jakob's Ribs

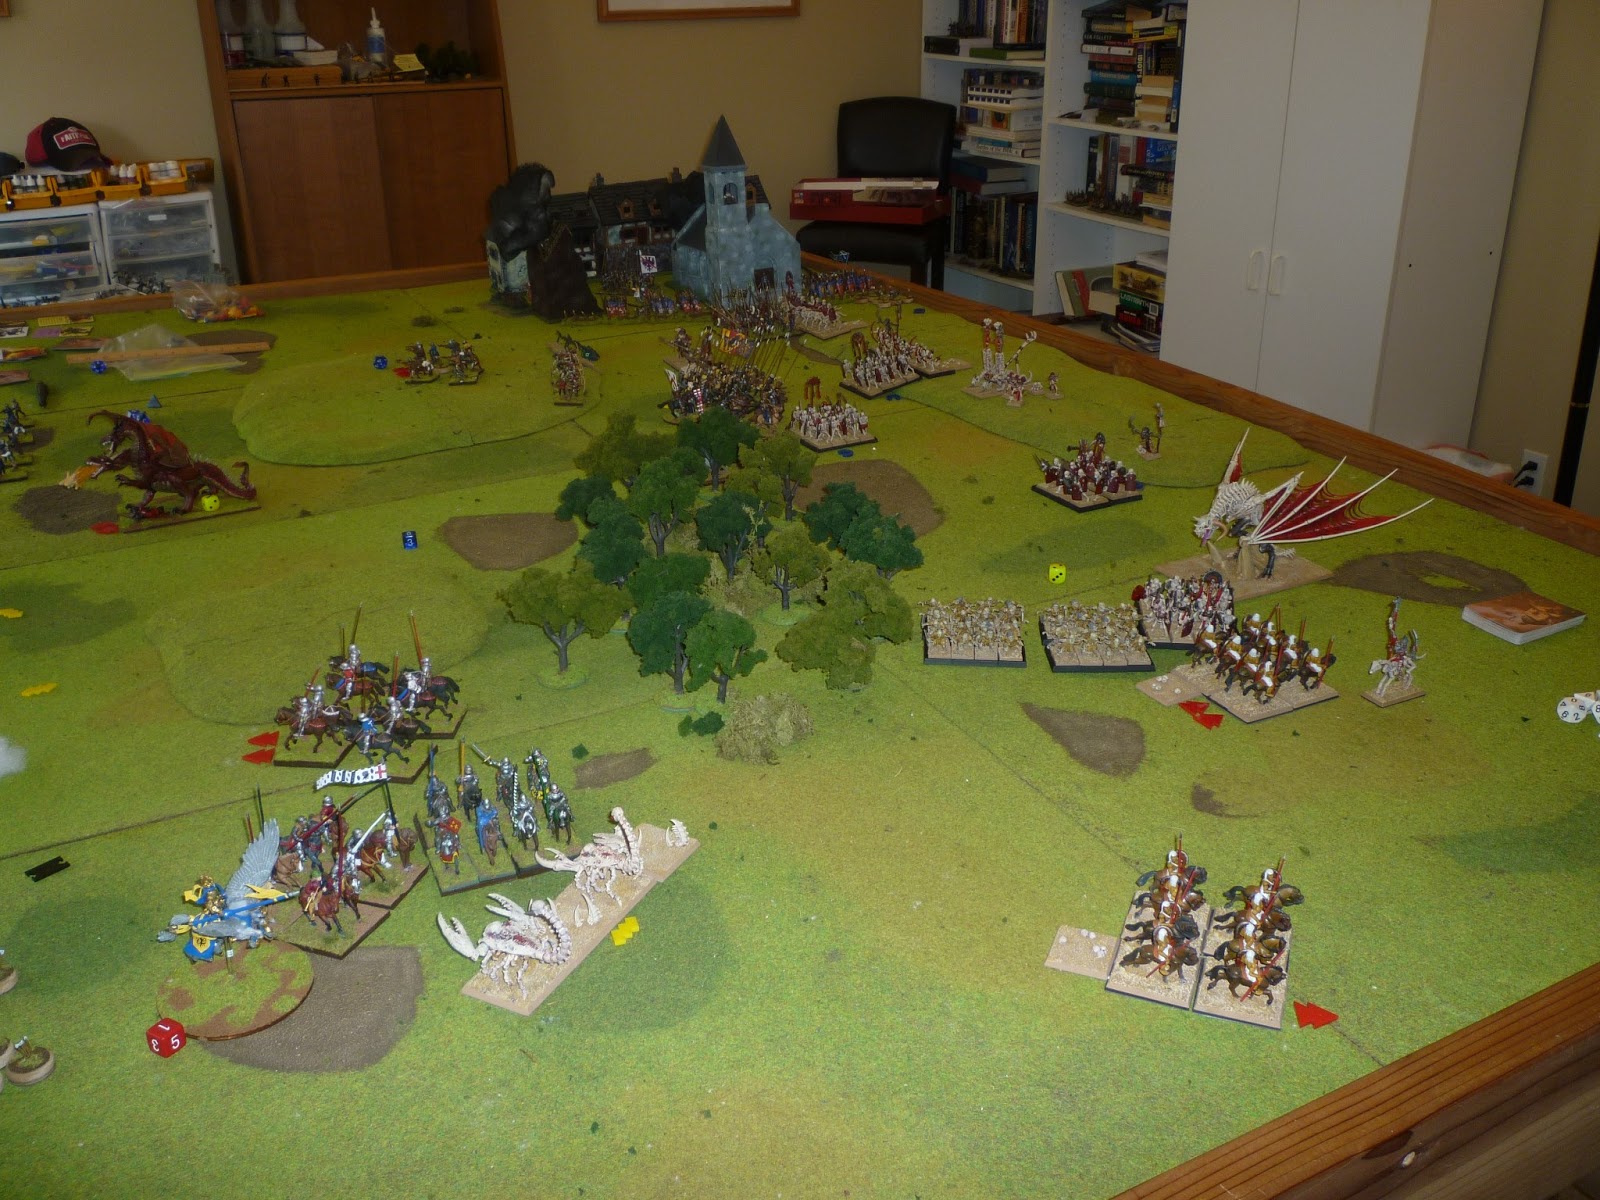
Jed and I fought a Hostile Realms "friendly" match yesterday between his Undead and my Middle Kingdoms knights.  Jed wanted to try a new unit mix for his Undead army to see if they could cope better with the extra-heavy knights of the Middle Kingdoms.  1750 points each.

The Undead fielded 24 units and leaders. The Middle Kingdom fielded 19 units and leaders.

Left Middle Kingdon
Right Undead
The Undead army consisted of an undead dragon, wraiths, wights,  vampires, a bone giant, zombie units, ghoul units, skeleton archers, infantry and cavalry, a unit of ghosts, and human minion cavalry.  They were led by the Necromancer, a lich, and 2 wights.

The Middle Kingdom army consisted of extra-heavy household and feudal knights, 2 pike blocks of mountaineers and civic militia, an organ gun, a red dragon, archers from the royal guard, crossbowmen, handgunners, and sergeant cavalry.  They were led by the King of the Middle Kingdoms mounted on a pegasus, Jhone of Orc, and a priest.

The scenario was that the town of Jakob's Ribs was besieged by the undead army and the Middle Kingdoms army was marching to raise the seige.  In the pictures, you can see the brave defenders of the town in the top corner, barricaded in their burning city.

I had 24 morale chips and I think Jed had 28 morale chips.We both rolled excellent generals, so each of us added the Brilliant Leader card to our decks.  I added an extra Courage card to my deck because I was fighting the Undead and my final optional card was Look to the King.

The Undead added a brilliant Leader card, an Uncontrolled Charge card, and a Superstitions and Omens card to their deck.

So as the battle starts, each side rolls initiative dice.  The difference between the initiative dice is the number of cards that each player can play from their decks.  The types of cards pulled dictate what the army can do.  Initially, the Undead had their typical trouble drawing Move cards, but then Jed drew his Uncontrolled Charge card.  This sent the undead dragon and bone giant hurtling across the table and they crashed into the flower of Middle Kingdom chivalry before the poor knights could even get out of their deployment zone!


Undead dragon

Ghouls, zombies, and skeletons

The Middle Kingdom army is deployed

Defenders of Jakob's Ribs
Before the battle, the garrison looks out from their fortifications.
The lord looks out from the church steps while archers in the tower
 seek out new targets.

Unit of ghosts.  These were later breathed on by a red dragon
and crushed.

Jed drew the Uncontrolled Charge cards from his deck
and his bone giant began a charge toward the waiting knights.

The undead dragon joined the giant in the charge and killed
two units of knights before he was driven off.

After the knights drove off the undead dragon, my own red dragon flew across the table and breathed fire on the unit of ghosts.  The dragon then crushed the crispy ghosts and charged into a skeleton unit behind them.  Behind the dragon, the cavalry and pike blocks of the main infantry command advanced.

My red dragon flew across the table and launched itself at the
undead.  After initial success, he routed after being flanked
while disordered.  Too exposed.

The knights led by their Rex grind down the bone giant.

Cool shot from table level shows the chaotic fighting as the
pike blocks and sergeants launch into the battle.  In the background,
the organ gun blasted a unit of wights, killing 3 of the 4 stands.
While the pike blocks fought very well, they faced a real challenge against the skeletons.  Even though the skeletons lost wounds to the pikes, they wouldn't rout, and the human infantry gradually tired as they fought them.  This was the first battle we fought where it really felt like the skeletons were fighting the way we imagined they would.


Cavalry battle on the right flank swirls around the bone giant.
He did a good job of blocking the knights and absorbing damage.

The wraiths killed the organ gun, but the battle continues
to be very confused.  They are hesitant to attack the pikemen

Long shot of the table.  The undead lich has managed to
rally the undead dragon while my dragon is fleeing off the
table.  Bad news for me.
By the time we had to pick up the table, the Undead had run out of morale chips.  Middle Kingdom was leading 12 -0, but the Undead had rallied their undead dragon and their vampires had just landed and begun slaughtering the missile troops of the Middle Kingdom infantry command.  A unit of wraiths fought a knight unit, and because the knights didn't have magical weapons, they couldn't do any damage to the ghostly warriors.  Eventually, the human knights had enough and they fled in fear from these invincible wraiths.

The outcome was still in doubt, but most importantly, the undead showed they could hold their own against the knights of the Middle Kingdoms.  The skeletons were great at slowing down the attack.  The undead dragon and bone giant also used their "Might" special ability to great effect, smashing through the extra-heavy armor of the knights as if were tissue paper.


Tuesday, March 5, 2013

Battle of Kasar River

This past Saturday, we fought another tabletop battle in our ongoing Hostile Realms campaign using Theater of War.  Hostile Realms is a fantasy Piquet ruleset that uses custom-made card decks to determine what actions armies can attempt on the tabletop.  Better armies have better decks.

The strategic situation is summarized here.

Undead Jed brought his undead army and he knew he was facing a tough battle against a much more numerous Middle Kingdoms (MK) army.  His army was also unsupplied from the campaign actions, but we forgot to include that in the army preparation.

The mounted nobility of the MK knights were massed on the left flank under the command of their pegasus-mounted King.  The center was held by 3 solid pike blocks of civic militia and mountaineers led by Jhone of Orc and her Blessed Banner.  This infantry command was backed up by a unit of minotaurs and several longbow units led by a priest.  The Middle Kingdom had 30 morale chips.  The Undead had 20 morale chips.

As the battle began, the Rex landed between the armies and challenged the Necromancer to single combat.  The Undead Necromancer wisely declined.  Grinning, he pulled out a magic flute and raised a thick forest in front of the Middle Kingdom cavalry.  The knights would have to fight their way around the tangled trees and through a unit of blocking wraiths of they wanted to flank the Undead.  Luckily they had been given blessed weapons before the battle to help them fight the magical wraiths.

After a few card draws and Undead spell attempts, the Middle Kingdom drew their Uncontrolled Charge card.  This card triggered impulsive charges by the heavily armored mounted knights on the left and the pikemen from the center command.  The mounted knights crashed into a unit of Undead wraiths, destroyed it, and continued on to rout several units of minion cavalry.

The Middle Kingdom pikemen rammed their pikes into the defending skeleton infantry and began to slowly push them back.  The Undead attempted to stop the momentum of the Middle Kingdom army with their own charge, but the solid pike blocks proved resolute.  Meanwhile the bloodthirsty MK knights began to turn and roll up the flank of the Undead army.  After several units had been destroyed, the morale chip advantage was Middle Kingdom 40 to Undead 0.  The Undead drew their Army Morale card and were forced to make an Army Morale check because they had no morale chips left.  They failed it by 1 and the Undead withdrew from the field.

The Theater of War campaign rules classified the battle as a Decisive Victory for the Middle Kingdom. Neither of us concentrated on capturing the various victory objectives on the table.  The Middle Kingdom was determined to crush the Undead with its numerical superiority and the Undead were content to wait and attempt to gain advantage through their magic.  The current National Will for the Undead was 21 (54-21).  The Undead stood to lose a minimum of 22 National Will for the defeat so they lost the campaign.  This last defeat weakened the power of the Undead Necromancer so his forces were no longer able to resist the might of the Middle Kingdom.

This concludes our test campaign!  We will have to reset it for a new one.

The MK center commands.

The battlefield seen from the end with the mounted knights.

The Undead center.

Close up the mounted nobles.

The impetuous pursuers charge into melee after destroying the wraiths.

Pikemen clash with the Undead center.

The Rex skirmishes with some flying carrion.

More impetuous knights pile into the minion cavalry.

The Undead attempt to push back the pike blocks.

The reserve command.  The Priest was never able to get these
guys moving.

The pursuit continues.  

Skeletons crushed under thundering hooves.

Long shot of the battlefield mid-action.


Saturday, December 29, 2012

Finished 28mm dragons

I bought these two painted plastic dragons from the internet after checking them out at my local Toys R Us.  I finally finished basing them.  The basing gave me a chance to practice my winter basing techniques and use two mounted knight casualties from my Old Glory HYW Casualty pack.  The mounted guys just wouldn't fit on my normal casualty markers.

To give you an idea of how big these dragons are, they are mounted on 100mm by 150mm bases.

I managed to get some snow on the horse too.

This dragon looks like he wants to play with his food.

The knight is about to be pancaked.

I tried to scorch the bottom of the horse a bit with some smoke.